There were always enough people who wanted to grow an orchid from seeds. In the old days, adult orchids were very expensive, and many wanted to have a tropical beauty in their collection.
Of the millions of seeds contained in the capsule, only a few germinated.
This continued conducting experiments on the germination of various seeds, including orchids, did not select a nutrient medium that resembled the composition for growing bacteria. In which germination became possible.
In the article, we will learn how to orchid seed germination at home.
orchid seed germination at Home
Let’s discuss the germination of orchids seeds in step by step process. What is orchid seed germination time.
Orchid Seeds

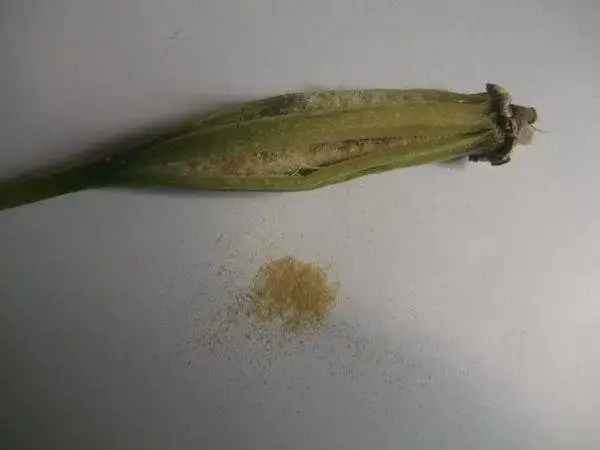
Orchid seeds resemble fine dust. For successful germination of tiny seeds at home, food is required, which is practically nonexistent. There is not enough strength to pull it out of the ground.
In order to obtain orchid seeds, it is necessary to pollinate it.
Therefore, the nutrient medium should be:
- It is saturated with useful substances;
- And readily available for seeds.
It is not recommended to buy orchid seeds in online stores. As a rule, anything is sold under the guise of orchid seeds. Instead of throwing money down the drain, and then growing no one knows what, you should try to pollinate the orchid yourself. But for this you will have to sacrifice the flowering of the plant that will become “mother”:
- Pollination requires two healthy orchids that have been blooming for several days. If one plant has larger flowers than another, then it is better to use a small-flowered orchid as a “mother”;
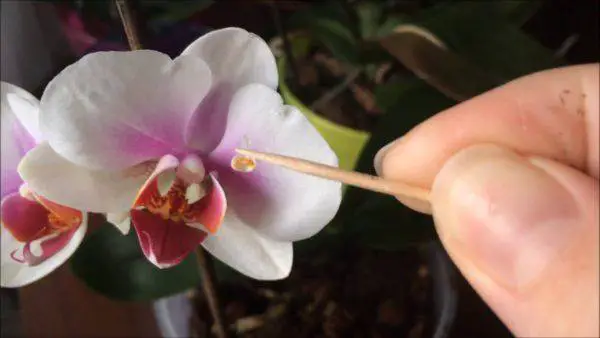
- The orchid flower has a column. There is a “cap” at its top. Use tweezers disinfected in hydrogen peroxide to bend this “cap”;
- The pollen under the “cap” in the form of wax droplets (pollinia), gently remove with tweezers ;
- There is a slightly sticky and damp indentation (stigma) on the front of the column where the pollinium is carefully placed . It should stick;
- When the stigma closes in a few days, pollination can be considered a fait accompli.
Several months pass from pollination to seed ripening. When the box begins to change color to yellow-brown, it must be cut off and wrapped in a napkin.
Important! Seed germination lasts no more than two years, it all depends on the type of orchid.
You may also like how to pollinate orchids to get seeds.
Nutrient Medium For Orchid Seed Germination: Media
It was mentioned above that tiny seeds cannot germinate on their own due to the lack of nutrients in the seed itself. In nature, only those that fall on the vermicompost accumulated on the bark of trees begin to germinate.
You can make your own seed germination mix. The basis for the composition of the nutrient is:
- Agar-agar;
- Sugar;
- And water.
- In order for seeds to germinate, they need a nutrient medium.
The composition also includes various minerals in strictly defined proportions. Which ones – depends on the genus of orchids. The possibility of preparing such a composition at home raises doubts, but a more simplified version also showed itself well in such experiments.
Important! To obtain a positive result, maximum sterility must be observed.
Components:
- Agar-agar – 8 g;
- Glucose – 10 g;
- Fructose – 10 g;
- Balanced fertilizer for orchids – 1.5 g;
- Activated carbon – 1 g;
- Distilled water – 1 liter.
Preparation of the nutrient solution:
- In 0.5 liters. pour water into agar-agar, let stand for several hours;
- Add glucose and fructose there;
- Simmer until the agar-agar is completely dissolved;
- The remaining 0.5 liters. boil water, add coal and fertilizer;
- Mix both parts of the liquid, cool to 30 degrees, check the pH, which should be 4.8pH – 5.2pN;
- If the acidity of the medium is below 4.8pH, soda is added, if it is above 5.2pH, citric or acetic acid is added.
Preparation of containers in which seeds will germinate:
- Rinse prepared glass containers without detergents;
- Scald the inside with boiling water;
- Sterilize caps: metal, plastic, or rubber;
- Pour a solution, 2 cm high, into containers, close with lids; You can use a regular jar for formula.
- Sterilize jars/flasks in a pressure cooker or double boiler for 15-20 minutes at a temperature of 121 degrees;
- Leave where sterilized, covered with foil or a clean cloth, for 4-5 days.
If mold has not appeared in the containers, you can start sowing.
See also can I put two orchids in one pot.
Sowing Orchids Seeds
Take a glass sterilized antibiotic jar with a rubber lid. Pour seeds from a napkin, add 15% hydrogen peroxide to 2/3. Hold there for 10 minutes, shaking occasionally.
With a sterile syringe with a large diameter needle, draw 1 ml through the cap. solution. Take out the prepared container and introduce peroxide with seeds through the lid.
Wrap the lid with cling film so that fungi and bacteria do not get inside. Gently tilting, distribute the peroxide with seeds over the surface of the nutrient medium.
Place containers with sown seeds in a dark place at a temperature of + 21-24 degrees. After 10-14 days, the seeds swell, after about 1.5 months they begin to turn green, developing chlorophyll. Now the flasks can be given a little light, 2000-4000 lux will be enough for them. The temperature remains unchanged.
The embryos gradually increase in size, acquiring the shape of a ball with a diameter of 2 mm. After 2-3 months, the ball flattens a little, turning into a disc called proto-feed, the first leaf appears from it. The seedlings are given more light, but direct sunlight is avoided. A tiny orchid will show itself in full glory in six months, and in a year the seedlings are ready to be transplanted into bowls.
Planting Germinated Orchid Seeds

How to germinate an orchid from seed at home?
When the orchid seeds have seen their light, they can be planted.
There is no need to rush to transfer the seedlings from the flask to the bowls. A signal for a transfer can be :
- The appearance of dark spots on the leaves and roots of seedlings;
- The nutrient medium was mixed;
- Seedlings have grown up enough, occupy ¾ capacity.
The young are taken out of the container as follows :
- Prepare a bowl of warm water;
- Put a container there, the water should completely cover it;
- Smash with a hammer or other heavy object.
With this method of removal, young orchids are least injured.
Several orchid seeds are planted in one container.
The seedlings are thoroughly cleaned of the nutrient medium and washed several times in clean water. It is very important that no traces remain from the solution, as it begins to deteriorate quickly in the air. Poorly washed plants become moldy and die.
Important! If the flask is broken due to the appearance of dark spots on the leaves or roots, then the babies must be kept in a solution of Chrinosol tablets for 15 minutes. It is advisable to take distilled water for this.
Spread the washed orchids on paper towels, letting them dry slightly. Do not dry them until the roots turn white.
The velamen layer on the roots of plants is still very small, therefore, in order for the baby to develop further, the substrate must be moisture-absorbing.
Sphagnum moss is best suited for these purposes. In this case, the lighting should be bright enough for maximum photosynthesis.
Check Maxillaria Orchid.
Conclusion
Before starting the orchids seed germination process, you need to know that:
- When growing an orchid from seed, patience is a key factor;
- From the moment of pollination to the first flowering, 5-8 years will pass under ideal conditions;
- Compliance with maximum sterility is a guarantee that the experience will be successful;
- You can fertilize young seedlings only after 6 months;
- Use B vitamins and growth stimulants no more than once every two months;
- Watering is carried out by spraying the upper layers of the substrate;
- The lighting should be bright, but not in direct sunlight;
- The duration of daylight hours is at least 10-12 hours;
- The temperature at night is not less than 18 degrees, during the day it is not more than +25.
If you are ready for this, then forward to new achievements.
