When choosing a stand model for home collection orchids, you need to take into account not only its compliance with the design of the room.
For a comfortable existence of your favorite plants, you should choose the right design , because mistakes can nullify all efforts to care for these whimsical creatures.

General selection rules for orchid stands
A successful orchid stand meets several requirements:
- The dimensions of the stand should ensure comfortable placement of orchids;
- The possibility of free and sufficient access to plants of light and air should be provided;
- You need to think about the moisture resistance of all materials, because high humidity is important for epiphytes.
Ways to Diy orchid stands
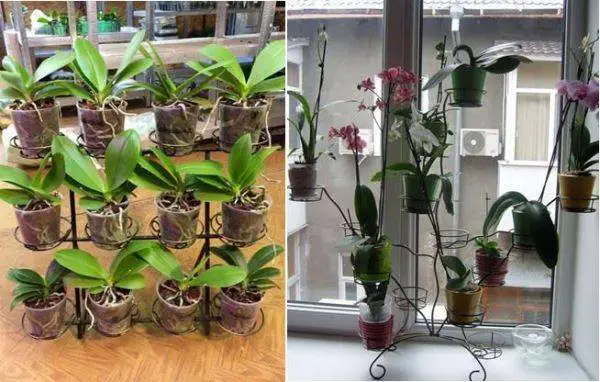
Among the most popular varieties are floor stands and special structures for the windowsill. Desktop structures are less common. You can see a photo of one of the stands below.
You can create a variety of stands for orchids.
The correct floor stands and those that are installed on the windowsill are light and mobile , accommodating several copies of whimsical tropics.
Important! Floor have the form of stairs, whatnots, shelves. For window sills, light metal profile structures with wire hanging baskets are usually selected.
DIY Orchid Stands from wood
It is not difficult for a craftsman to make both a pot and a unique and convenient stand made of wood with his own hands, on which the florist will grow their orchids.
Popular Options:
- Using natural materials with minimal processing;
- Decoration of household items – stairs, drawers;
- Production of special structures from bars and planks.

here is Best Orchid Pots For Phalaenopsis ultimate guide.
natural materials
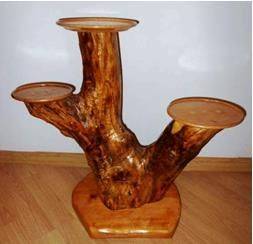
They pick up one piece of a tree trunk (stump, chock) with several thick branches-branches directed in different directions, cut it to get horizontal ones.
Be sure to install on the base , with an area of \u200b\u200bat least 50% larger than the diameter of the main trunk to give stability.
Sanded, treated with an antiseptic solution , primed. A tray for a pot with a plant is fixed to each horizontal. Then varnished or painted, giving the product the desired style and appearance.
Diy Orchid Stands From the old stairs
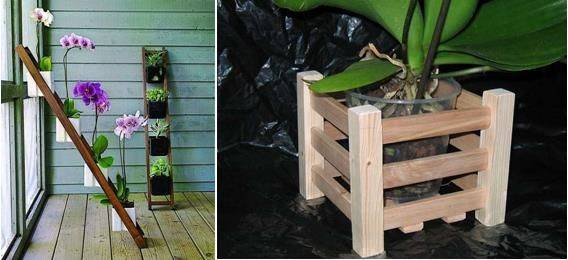
From a low wooden stepladder, you can get an original and convenient stand for orchids, the main thing is that the distance between the tiers allows you to comfortably place the available specimens.
For this old surfaces:
- Sanded;
- Cleaned from dust;
- primed.
If the staircase is not too stable or it has narrow steps, you can install additional shelves , fixing them on opposite steps of the same level.
Vegetable boxes mounted on a base and assembled in the form of a bookcase are also suitable. Their advantage is excellent ventilation.
Sometimes ladders are used for stands.
Finishing :
- Staining with moisture resistant paint;
- Lacquering;
- Decoration with jute twine;
- tree bark;
- Moss.
Steps to DIY Orchid Stands
It can be a habitat for one orchid a basket, or a habitat for a whole collection in the form of a rack.

The inner size of the basket is slightly larger than the pot that they plan to place.Attention! The length of the bars for the side walls should be 7–10 cm longer than the diameter of the pot. The height of the bars of the legs is 5–7 cm more than the height of the container.
4 bars with a square section and 12 with a rectangular section are required. Their size depends on the size of the stand and should be in harmony with the dimensions of the pot. All elements are fastened with:
- self-tapping screws;
- And PVA glue.
The dimensions of the shelf or whatnot are selected individually . It is recommended to make not too large mobile structures. Each orchid requires free space up to 80 cm in height, provide for free (with a margin) placement of flower pots.
For the side shelf you will need :
- 2 long bars 50 mm x 50 mm (specific length depends on the expected number and size of plants);
- For each container, a short (in the width of the structure) bar 40 mm x 40 mm plus one more is fixed at the base of the structure;
- 2 fixing hooks for each pot;
- Self-tapping screws.
One end of the long bars is sawn at an angle of 45 0 , these will be the legs of the whatnot. The first transverse bar is fixed with self-tapping screws at a distance of 15-20 from the bottom.
The following crossbars are fixed at a distance necessary for the free placement of containers , the planters will rest on them, and their upper part must be fixed with hooks attached to the side bars.
To make a mobile shelf, you need to prepare:
- Wooden bars and spikes;
- Plywood sheet;
- Wheels for furniture;
- self-tapping screws;
- Jigsaw, screwdriver, drill, brushes.
Often make mobile stands for orchids.
The final height of a two-tier structure can be 1 m, shelves with 3 shelves – 1.75 m. The width depends on the number of plants in the collection, but to maintain mobility, you should not make it wider than 1–1.5 m.
First cut plywood shelves . Then 2 frames are assembled from bars. Inside each, at the height of the intended shelves, additional support bars are attached, and the same frame elements are fastened together.
At the bottom of the structure, two transverse long (to ensure stability) bars are installed . After finishing the decorative finish of the frame, pre-prepared and painted shelves are placed on it, furniture wheels are attached to the legs.
Finishing of all wood products includes:
- Grinding and cleaning of surfaces;
- Impregnation with an antiseptic composition;
- Primer;
- Staining or coating with decorative varnish.
Want to know How To Buy Orchids?
Extension cords
An orchid extension is used when making bouquets of single flowers. It is a short plastic stick with a small water tank at the end. A flower stalk is inserted here , it turns out that each of them sits not on a common peduncle, but on a long individual one.
Produced by manufacturers of accessories for floristry. You can buy in floristic companies and decor salons. Extension cords are sold in packs.
IMPORTANT! The cost of each, depending on the region and the method of purchase.
orchid holder stick
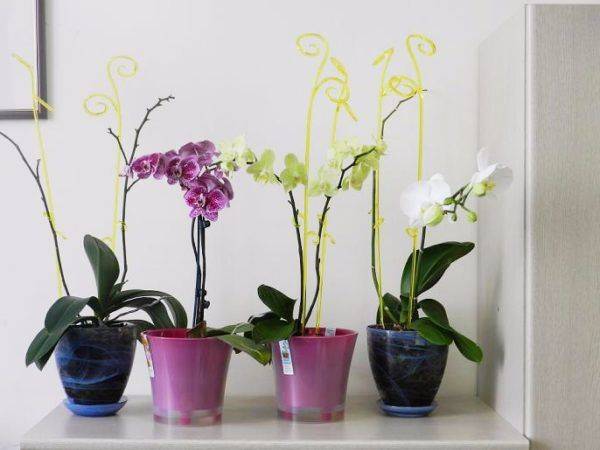
The holder is needed to support long heavy Spike. Usually these are sticks:
- Wooden;
- Or plastic;
- Pointed at one end;
- Fantasy on the other.

The pointed part is placed among the roots and fixed with a substrate . Wooden products are not aesthetically pleasing. But the plastic ones are crowned with graceful curls in the form of:
- butterflies;
- Hearts;
- Lepestkov.
They are in perfect harmony with delicate flowers. Produced by companies operating in the floristic industry. The cost of accessories is low, in different regions – within 40-100 rubles apiece .IMPORTANT! You can buy in specialized flower shops or specialized departments of shopping centers.
How to use orchid holder stick?
How to tie an orchid to the holder? In order not to harm the plant, you need to properly attach the peduncle to the support .
When is it necessary to fix the Spike?
The Spike must be fixed to the holder if there is a danger of the pot tipping over as the flower brush grows.
Orchids are tied to the holder so that the pot does not tip over.
It is necessary to lift and tie up the brush even if the plants begin to interfere with each other.
What can be tied with orchid holder stick?
Strictly speaking, a garter is any method of attaching a peduncle to a holder. For this use :
- Special plastic clips or “crabs”;
- Synthetic thread;
- Thin wire in soft insulation.
Installing orchid holder stick
Orchid garter is carried out gradually and very carefully:
- Peduncles, though strong;
- But fragile;
- Break easily.
It is better to take care of installing the support at the same time as transplanting the plant , at this moment there is the least chance of damage to the roots by a foreign object.
The garter process begins when the peduncle grows up to 10 cm . The stem is gently pulled to the holder, and not necessarily immediately close. As the peduncle grows, the garter is continued, the fastenings are located just below the flower buds.
In what cases can it be dispensed with?
Orchid Spike are endowed with sufficient strength to hold a large number of large, heavy flowers. In nature, many inflorescences hang below the level of the roots. At home, you can also do without a garter if orchids:
- Firmly fixed in hanging baskets;
- On wall blocks;
- Tightly standing pots.
Conclusion
A harmonious unique interior is impossible without taking into account many details. Such, for example, as a well-chosen flower stand and other floral accessories.
Create an elegant entourage for luxuriously blooming orchids, and you will become the owner of an original exquisite composition . Just do not forget to properly care for orchids at home .
