Among the many types of orchids among flower growers, the phalaenopsis or butterfly orchid is especially fond of. The flower is not as difficult to grow as other species, it has outstanding decorative qualities, it can be of different shades. Like any other plant, from time to time the phalaenopsis orchid needs a transplant: how and when to transplant phalaenopsis orchids at home, we learn from the article.

when to transplant phalaenopsis orchids?
The fact that the Phalaenopsis orchid needs a transplant can be understood by some visual signs.
Deposits of moss and algae become noticeable on the walls of the pot. This indicates stagnation in the ground, its poor ventilation. If you leave the flower to grow further in such conditions, it will wither, and may die: in conditions of stagnant moisture, the roots often rot. A transplant in this case is an urgent need, providing the plant with normal living conditions.
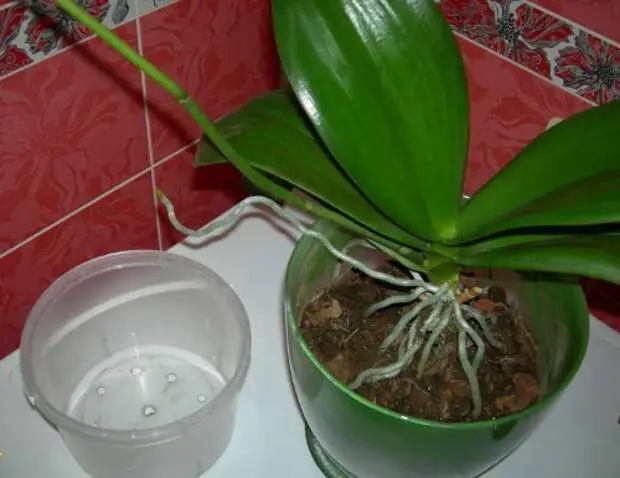
If you see through the walls of the transparent pot that the roots of the orchid have filled almost all the space inside, then the time has come for transplantation. It is necessary to carry out this procedure by replacing the old pot with a new larger one.
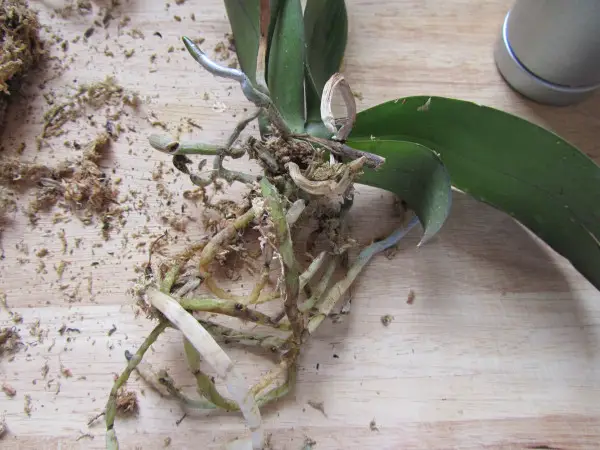
Root damage is also a strong reason for replanting. It is to detect problems with roots that it is advised to plant this flower in transparent containers. Healthy orchid roots are green with a slightly silvery sheen. If you notice through the walls of the pot that the roots have darkened, have begun to dry, you should not hesitate with the transplant.
If harmful insects are found on a flower or in the soil, it is also necessary to transplant and replace the substrate.
If the leaves wither, decay, even after watering they do not become elastic, it is better to transplant the orchid. But first carefully examine its roots and find out what is the cause of the problem.
If a flower “sits” freely in a pot, can move in it, then the roots have rotted. A transplant is urgent here.
should i repot my orchid after buying
It is not always necessary to transplant the phalaenopsis orchid after purchase sometimes the plant can be left in a store pot. How to understand that a transplant is needed, we will figure it out further. Here you may like How To Buy Orchids?
Firstly, you should definitely transplant if a flower grows in an opaque pot. If not transplanted, care will be much more difficult.
Pay attention to the roots. If there are even minimal signs of deterioration, rot, mildew and darkening, be sure to transplant. The putrefactive processes that have begun may also be indicated by an unpleasant odor emanating from the flower.
You should also take a closer look at the substrate in which the plant is located. Often the store does not attach much importance to the composition of the soil, allowing the inclusion of various components: peat, fibers, foam rubber. Such inclusions are needed, of course, but in a reasonable amount. If there are many of them, they accumulate a lot of moisture, which leads to stagnation of water in the ground.
Time for transplanting phalaenopsis orchids
If most indoor flowers are transplanted when they leave the dormant period, a similar schedule does not work with the phalaenopsis orchid. The fact is that this plant simply does not have a pronounced dormant period. The flower grows and forms new leaves all year round, periodically leaving for short “vacations”. It blooms for a very long time for several months.
The optimal time for transplanting, however, is spring from February to May, when the most active growth and development of the flower is observed. Experienced florists advise to time the transplant at the time of the shutdown in the spring of heating in the apartment.
Post-flowering is also a good choice.
Is it OK to repot orchids during flowering?
It is undesirable for transplanting to choose the time when the phalaenopsis blooms. It is best to wait until the flowering stops, the buds fall off – then carry out the procedure. Transplanting during flowering causes a lot of stress in the plant, can lead to the premature end of bud formation. If the flower is already completely cramped in the old pot, replant, but only without destroying the earthen coma.
However, there are situations when a transplant is urgently needed: for example, if root rot has begun. In this case, be sure to replant, cutting off the rotten roots and destroying the old earthen lump. Of course, such procedures will negatively affect flowering, but the life of the plant will be saved.
How often do you replant orchids?
If the flower grows and develops normally, no putrefactive processes are observed, water stagnation too, transplantation is carried out every 2-3 years. By the time of the planned transplant, usually:
- there is a partial decomposition of the substrate, the loss of its permeable qualities, the overgrowth of the walls of the pot with moss and the accumulation of salts in the soil;
- the acidity of the soil also increases, which leads to insufficient absorption of iron by the roots – therefore, to the appearance of chlorosis of the leaves;
- the root system is declining due to waterlogging, poor soil permeability, an excess of salt;
- the roots braid the earthen lump completely and protrude from the drainage holes;
- the stem of the orchid is strongly stretched, often becomes bare by the time of transplantation, sometimes hangs to one side from the pot;
- roots, overgrown, dry out from below.
By the indicated signs, one can understand that the time for the planned transplant has come. Check it out how to pollinate orchids to get seeds.
Best Pots and potting medium for orchids
We will find out which orchid pot to choose and how to prepare the substrate.

Choosing best pots for phalaenopsis orchids
For a phalaenopsis orchid, not every pot sold in a flower shop is suitable. A correctly selected container should take into account the presence of aerial roots in the plant and its need for good lighting and airing.
what kind of pots for orchids
Modern pots made of transparent plastic are best suited for the plant. Most often, it is in such containers that a flower is sold in a store. Such a pot can be either completely transparent or matte, color options are often found. Pros:
- good illumination of the roots;
- control over the condition of the root system and the level of moisture;
- lack of sticking of roots to the walls of the pot.
If you decide to stay on a color version, choose a lighter one: this way the plant will be provided with good lighting.
The recently popular mesh pots and wooden slats are now not used for growing orchids. The fact is that the substrate in them dries out too much, which is unacceptable when growing these flowers. If such pots are used now, it is exclusively for decorative purposes.
It is better not to take a glass container, although it is completely transparent. In the glass, the roots will become very waterlogged, which is harmful for the orchid. You can use a glass pot only as a decorative container on top of the “working”.
Although the best material is plastic, it is permissible in a pinch to use ceramic, clay pots. But although such containers are very practical, they have one significant drawback: they do not transmit light. Often, therefore, the roots of the orchid grow into the ceramic walls, which then, when transplanted, leads to their severe injury.
Check it out Do You Cut Off Dead Orchid Stems?
Do orchids need pots with holes?
Always choose a pot with drainage holes. The presence of holes ensures the entrance and outflow of water during submerged irrigation, ventilation of the roots.
There are pots on sale with different arrangement of drainage holes. When choosing, be guided by the conditions in which the orchid will grow. If the air in the room is humid, a pot with holes in the side and bottom will do. If the air is dry, it is better to take a container where the holes are only at the bottom. It is not worth taking pots with only side slots, since with submerged watering, in this case, the water will not be able to fully wet the substrate.
If there are few holes, drill additional holes in the pot: they should be no higher than a third of the height of the pot.
If the transplant is carried out as planned, due to the entanglement of an earthen coma with roots, it is correct to choose a new pot with a volume slightly larger than the previous one: literally by 1-2 cm in diameter.
You should not choose very large pots for the Phalaenopsis orchid. The fact is that a significant volume of the substrate will dry out for a long time, that is, stagnation will become more likely. In addition, it will take too long for a large earthy clod to braid the roots.
If there is no opportunity to purchase a ready-made pot or you need a non-standard size, you can make it yourself. You need to take a plastic bucket of a suitable volume and pierce the drainage holes in it with a hot awl.
What is the best potting mix for phalaenopsis orchid?
You can purchase a ready-made store substrate for the orchid. Its main component should be pine bark. Additional components are:
- sphagnum; (Sphagnum Moss For Orchids)
- fern roots;
- charcoal.
It is important that the substrate is loose and has good permeability. The roots of the orchid must be well ventilated, so the loose properties of the soil are a must.
All the components that make up the substrate should be fairly large: this will help them not stick together longer in the pot. If the soil consists of components of a fine-grained fraction, it is better not to buy it.
If there is no other option on sale, it is better to purchase pure pine bark and make a substrate from it. Of course, you will have to tinker. Cooking procedure:
- bark is collected from fallen pines (not from living ones!);
- the future substrate is washed in water;
- crumbles with pruning shears into pieces of 1.5-3 cm;
- the bark should be boiled for 10-15 minutes to disinfect, remove dirt, tar, larvae, microbes;
- pieces of bark are washed again in water and boiled a second time;
- dried on trays.
Note that it is not necessary to completely dry the bark: the orchid may well be planted in a slightly damp substrate.
Recommended for you Using Vermiculite for Orchids.
Supplements
The bark is not removed from the trees that have begun to rot, as it will quickly decompose and crumble, it will become too dense. In addition, such a bark can contain many pests and pathogenic microbes, fungi.
Instead of boiling, you can ignite the bark in the oven at 200 degrees. The procedure for such disinfection should take at least 5-10 minutes.
how to repot phalaenopsis orchids indoors?

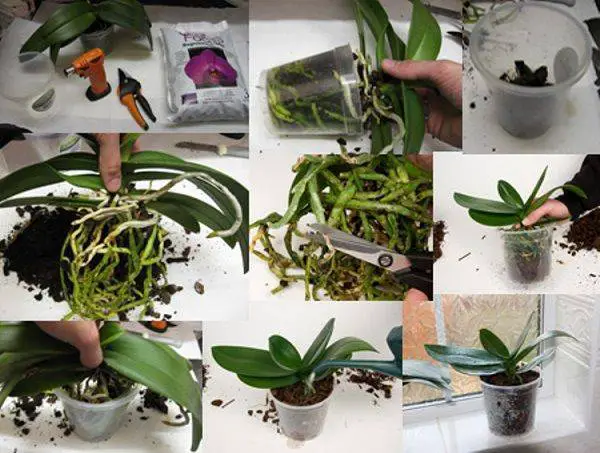
To transplant the phalaenopsis orchid, you need not only a pot of soil, but also many other substances and devices. Which ones, we will find out further.
- So, first of all, get a suitable pot, and also prepare a basin in which work with the earth will be done.
- The prepared substrate should already be available at the time of transplantation. In addition, you will need a drainage of expanded clay stones, crushed brick or broken ceramics. Styrofoam is not used as drainage, as small balls can plug the drainage holes.
- Prepare a cutting tool: scissors or pruning shears. Remember to disinfect them with rubbing alcohol.
- As an antiseptic, you can take charcoal: charcoal or activated. Coal must first be crushed.
- It will be useful and sphagnum moss. But if you can’t get this component, nothing terrible will happen.
- Prepare a small stick to make it easier to push the substrate between the roots. If necessary, stock up on a peduncle holder.
- For the prevention of rot and additional disinfection, Fitosporin is useful. If there is a need to carry out pest prevention, arm yourself with Fitoverm.
Recommended for you Where To Put Orchids In Your Home?
Transplant process
- First, prepare a Fitosporin solution to soak the orchid dug from the old substrate in it. The drug is diluted in a ratio of 1/5 of a teaspoon to half a glass of warm water. Then the resulting liquid is diluted with a couple of liters of water. Adding a drop of Epin to the solution will come in handy and will help activate the plant’s immune forces.
- Take some old substrate (if it is not infected with fungus, rot or pests) and mix it with the new one. Thus, the orchid will survive the adaptation much better.
- Remove the plant from the pot and examine the roots carefully. All blackened, rotten, slimy roots must be trimmed and disinfected.
- Remove wilted, withered and wilting leaves from the plant.
- Dry the orchid outdoors for 8 hours before placing it in a new pot. This measure helps the roots to aerate well, eliminates putrefactive processes.
- Transplant the orchid into a new pot and dust thoroughly with substrate. At the bottom of the pot, there must be a drainage layer 3-5 cm thick. The flower must be placed exactly in the center of the pot: the orchid has only one growth point.
Important: treat the plant very carefully, as its roots are quite fragile.
Orchid care after transplant
After transplanting, remove the plant in a place protected from drafts and direct sun. The optimal temperature for adaptation is the range from +20 to +22 degrees. It is undesirable to move and rearrange the pot unless absolutely necessary. Thus, the flower will adapt in a secluded place for about 10 days.
An orchid needs a lot of light: but soft, diffused. After adapting, place the pot on a window on the west or east side of the house. If the windows are only south-facing, provide the flower with a curtain or other cover at midday.
If the orchid has a tendency to grow laterally, tie it up so that the trunk does not completely deform during adaptation. If the flower straightens up after a month or two and begins to grow upward, the garter can be removed.
Leaving should also include feeding. For the first time, a transplanted orchid is given vitamin fertilizers 7-10 days after the change of residence.
Watering features
Phalaenopsis does not need watering for the first 3-4 days after transplantation. Usually, planting is done in a moist substrate, so there is no need for additional moisturizing procedures. But if the air is dry or it is hot, it is permissible to spray the soil: it is important to ensure that water drops do not accumulate in the leaf axils.
For the first two to three weeks, water the flower only as needed and carefully. It is better to use warm water and apply the shower principle: after the procedure, be sure to dry the outlet and foliage.
Three weeks after the flower is finally rooted, you can return to its standard watering by immersion.
So, we learned how and when to transplant phalaenopsis orchids indoor at home. The procedure is not the easiest one, however, under certain conditions, it is absolutely necessary. By adhering to our recommendations, you can do this job correctly and get a wonderful result in the form of a healthy and abundantly blooming orchid.
